Automate scheduled builds with Hugo, Netlify, and GitLab’s CI/CD pipeline

There are many business cases where a regular, timed site build in Hugo is required. Publishers, for example, set articles to future published dates and will expect to see them when that date passes. Organizations that handle events expect upcoming event agendas to be accurate and expect past events to archive automatically. But as a static site builder, Hugo builds only when requested. So how can we schedule builds to handle these state changes that come about due to the passage of time?
Note: we built a test Hugo repository to play around with for this article.
Known solutions—but with dependencies
There are many approaches to this problem. DJ Walker, in Automatically Publish Scheduled Posts For Your Static Site, shows us two methods, using CircleCI or an AWS Lambda task. I’ve also read articles that recommend IFTT, Zapier, or other cronjob-style services.
However, I prefer not to introduce external dependencies whenever possible—and some of these suggested solutions have a cost associated with them. I was happy to realize that I could schedule Hugo builds to Netlify using GitLab’s built-in CI/CD Pipeline, for free. It requires only a bit of effort to sort out and implement pipelines.
But first: doesn’t Netlify already implement Continuous Deployment?
What Netlify does, when it does its CD magic
Continuous deployment works by connecting a Git repository to a Netlify site and keeping the two in sync. Netlify Documentation: Deploy with Git
Netlify’s incredible magic at setup and deployment can obscure the gear of complexity that drives what’s happening behind the scenes. Who amongst us hasn’t connected up our Git provider, selected a repository, selected the master branch, and—boom—had our site deployed? It’s beautiful.
Moreover, out of the box, Netlify implements Continuous Deployment: every push to the master branch triggers the deployment cycle. So how does that happen, exactly?
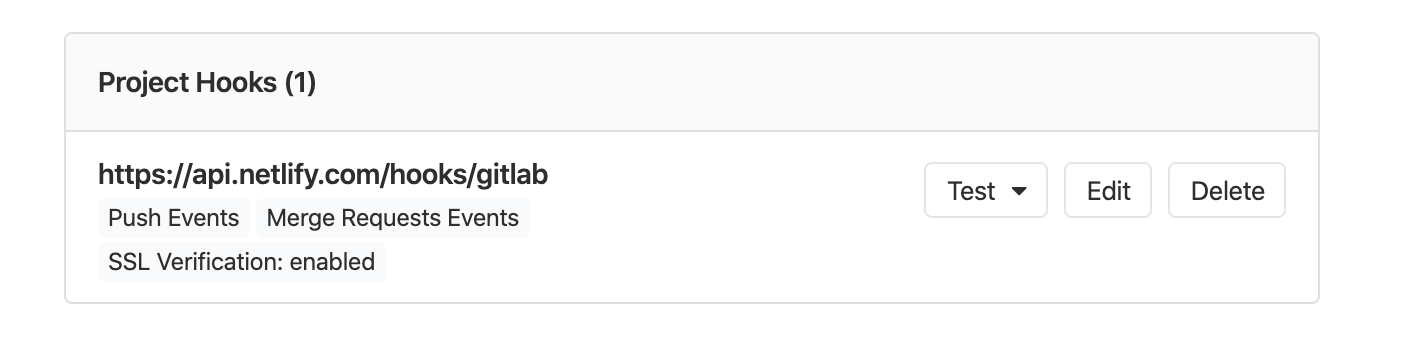
Netlify and GitLab Project Hooks
When you authorize Netlify to publish your Hugo project, Netlify creates a GitLab Project Hook in your repository on your behalf. You can see it in Settings ➔ Integrations:
 What’s a GitLab Project Hook, or, more generally, a webhook? According to GitLab:
Webhooks are “user-defined HTTP callbacks”. They are usually triggered by some event, such as pushing code to a repository or a comment being posted to a blog. When that event occurs, the source app makes an HTTP request to the URI configured for the webhook. The action taken may be anything. Common uses are to trigger builds with continuous integration systems or to notify bug tracking systems. (Documentation)
So, more clearly: A GitLab Project Hook is a webhook in which git events like pushes, issues, or merge requests cause GitLab to send a POST request to an identified external URL. During setup, Netlify does all the hard work of wiring this up for us: it sets the URL (https://api.netlify.com/hooks/gitlab), the conditions (merge requests or push events), and a method (SSL).
This handles one side of our Continuous Deployment coin: a push to the repository triggers Netlify to pull, build, and deploy via Project Hook. But for our case, we want to do this on a scheduled basis without a push or merge event to the repo. It turns out, we can’t build this feature atop of Project Hooks in the same way, but we’ll still make use of webhooks. Let’s press on.
GitLab CI/CD Pipelines
Pipelines are how GitLab implements CI/CD. Continuous Integration serves to improve code, catch bugs, and check for out of date dependencies by running tests automatically; Continuous Deployment delivers code to test, staging, or production environments consistently. A Pipeline is a method of automating these steps in a software life cycle into consistent phases, like ‘build,’ ‘test,’ ‘deploy.’
Steps like ‘build’ or ‘deploy’ are called stages: they define how and when to run a series of commands or jobs. Stages run in sequence; typically the chain stops altogether if a job or test in a stage fails. Jobs in a stage are executed in parallel, given enough resources in your GitLab installation. GitLab uses isolated virtual machines, or runners, to execute jobs. Finally, a pipeline may have a schedule, which runs the pipeline at a specified interval. And that’s what we need for our scheduled deployments.
Setup and test a Netlify webhook
Like the Project Hook above, our pipeline is going to request Netlify to pull and build our project. To do that, we’ll need a different URL, a webhook from Netlify’s side. It’s easy to create this. Go to Settings ➔ Build & deploy ➔ Build hooks, and add a build hook with a sensible name:

You can test this Netlify webhook directly from the terminal. Run
curl -X POST -d {} https://api.netlify.com/build_hooks/<your token here>
And watch the Netlify deploy screen; you’ll see you’ve triggered a deploy. Great! Now let’s automate this with a pipeline.
Configure a pipeline
There’s a fine quickstart in GitLab Docs on setting up pipelines. You’ll first create a .gitlab-ci.yml file in your root directory. Interestingly, for our scheduled deployment job, we don’t need stages. We also don’t want this job to run every time there’s a push or merge event. Let’s specify the job:
 Scheduled deploy to Netlify:
   image: alpine
   only:
     - schedules
   script:
     - apk add curl
     - curl -X POST -d {} https://api.netlify.com/build_hooks/$NETLIFY_HOOK
The devil is in the details:
- Note the job name is
Scheduled deploy to Netlify:— I was very unclear on the syntax of job names. Many examples use dashes, or include the word job in it. In my book, the clearest job name should win. Since spaces are allowed, I’m using them here. - GitLab’s runner sets up a virtual machine, but it’s up to us to decide what’s going to be in it. Here, we specify alpine, a minimal Docker image that weighs in at just 5MB. All we need our VM to do is trigger our webhook URL, so alpine’s small footprint helps this job to execute fast.
- Since our pipeline will execute on every push or merge event, we want to restrict this job to running only when scheduled: hence the
onlyparameter. Otherwise, we’ll inefficiently (and potentially expensively) trigger Netlify to build twice on every push: once for it’s already integrated Project Hook, and once for this pipeline job. - Alpine isn’t packaged with curl out of the box (several Docker images do if you prefer to use those instead). So our first command installs curl.
- Finally, we’ll do what we did by hand above: trigger the Netlify webhook with curl. While you could paste the URL here, this project might be public: bad actors could abuse the deploy hook and run up build costs. The secure option is to encode this as a GitLab environmental variable, here called
$NETLIFY_HOOK, which you can set up in your project’s Settings ➔ CI/CD, Variables section.
Test the pipeline
Once you deploy this file to your project, you can test the pipeline syntax with the Lint tool, at CI/CD ➔ Pipelines.
Once you push your .gitlab-ci.yml file to the repository, you can test the pipeline syntax with the Lint tool. You can find the button, “CI Lint,” in the upper right corner under CI/CD ➔ Pipelines or CI/CD ➔ Jobs.
Schedule the pipeline
Configured, tested, let’s get it scheduled. Go to CI/CD ➔ Schedules to get this configured. You’ll need a cron-job syntax, which is hard to work with. I really liked crontab.guru. Here’s the syntax for every six hours, for example: https://crontab.guru/every-six-hours
Test the schedule
Finally, you can test your scheduled pipeline in CI/CD ➔ Schedules by hitting the play button. Each time it executes, you’ll see the results in your Pipelines page.
Done
That’s it! Thanks to the power of scheduled pipelines, Netlify will pull and build your project as needed. Note that the exact time may be slightly off depending on the runner’s tasks, and you should read up on your GitLab instance’s resources. Don’t use this as an alarm clock for precisely 12:00 am, for example, without investing in resources for greater precision. But for the typical use case (rebuild every other hour or so), this solution will work fine, and for free.
What experiences have you had scheduling deployments? Let me know.