How I built a Kanban writing status system inside Ulysses

The challenge: where’s that draft?
Ulysses allows you to create as many folders and subfolders as you like. For me, over the years, these have flourished like mushrooms in a spring woods. For context, I have a low-thousands count of documents spread across multiple dozens of folders and subfolders. I have some folders dedicated to specific work sprints. Some dedicated to writing initiatives, like NaNoWritMo. I created folders in the context of training programs, consultants, and the like. Some hold client strategy, or contracts, or old meeting notes.
The challenge is that I have several projects that are focused on the regular production of completed writing. Ideas move from back-of-the-envelope scratches to validated, drafted, edited, and published. So across these many projects, I have ideas and drafts in various levels of completion, spread across dozens of folders — disassociated to each other and typically lost. I arbitrarily tagged many with past attempts at order, like v1, edited, and that always dreadful final-final. I couldn’t reliably find work in progress, or my thoughts on some initiative, or especially the overall status of a particular project.
Moreover, looking into dozens of folders introduces mental fatigue. Should this be archived or not? Why wasn’t this finished? Why did I think this thing was important? Poor organization leads to the use of “favoriting” work, to bubble it out of the chaos. Once favoriting becomes an organizational principle, it’s time to tear it all down and start again.
But this ship is already at sea. I can’t afford to start over. I needed to create a system that I could implement quickly, consistently, and over time, moving projects to it as needed.
The tools: what does Ulysses provide us?
I love Ulysses for its broad flexibility. It provides many critical building blocks for this system.
Writing Targets
Ulysses implemented writing targets in a reliable, straightforward, clearheaded way. You can set a goal on a document, or, even more powerfully, you can set a goal on a folder (“Group,” in Ulysses-parlance). It’s straightforward to set a daily writing goal, write against it, and see a report of your historical work.
Folders — “Groups”
It’s easy to create a group of documents. But Ulysses also allows you to configure them with charming, meaningful icons. Look: this stuff is small, but if a little emotional nudge reminds you, dear writer, of why the project is valuable, so much the better.
Tags — “Keywords”
You can create, on the fly, as many keywords as you like; you can manage them and develop a set of favorites, and you can assign keywords to documents (but not folders).
Filters — the secret sauce
While a folder is a “physical” collection of documents — a document is located in a folder and can’t be in more than one folder at once — a filter is a logical collection of documents. Filters can be created based on dates, sheet attributes, keywords, or text. But it’s filters based on keywords that transformed my workflow and lead to my Kanban breakthrough. Let’s see how it works.
How to Set Up a Kanban Writing System in Ulysses
1. Establish a project keyword name for every project
By convention, I use an all-cap, three- or four-letter acronym to identify every project. So, the project “Reluctant Family Archivist” becomes RFA.
2. Establish your Kanban process steps
Your process can be as simple as “To Do,” “Doing,” and “Done.” I use a multi-step process, and name the tags so they group:
- On Deck: it’s an idea that’s cleared for takeoff. Keyword:
status:on deck - In Progress: it’s in a draft state. Keyword:
status:in progress - In Review: it’s ready for editing. Keyword:
status:in review - Published: it’s done. Keyword:
status:published
3. Create a document repository, and set your writing goal
Here’s half the revolution. Rather than locating your documents in dozens of individual folders, you’ll locate all your documents in a single repository, and use filters to sort them. You can add other groups below that if you like. So: name your document repository, set your writing goal, and choose an icon that’s meaningful to you.
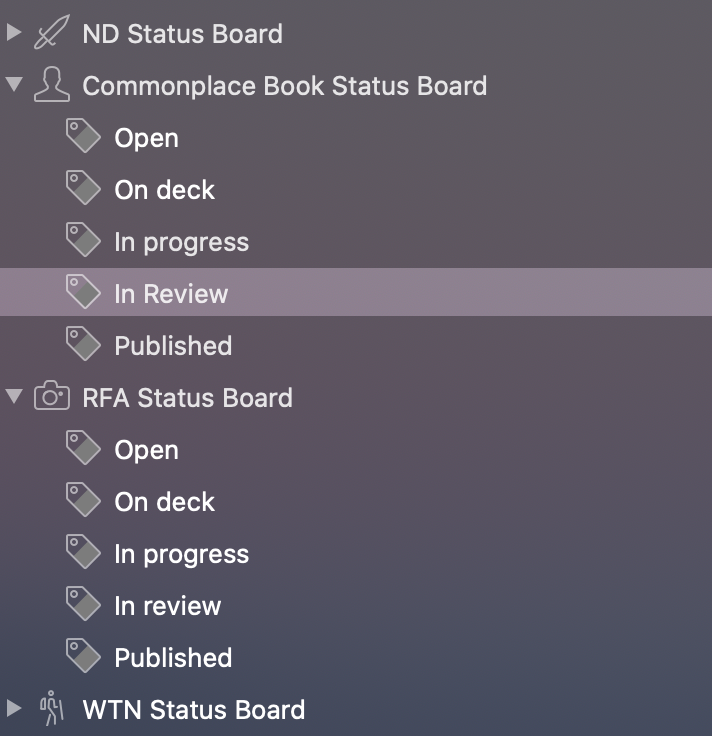
4. Create your project “status board” as a group, then fill it with filters
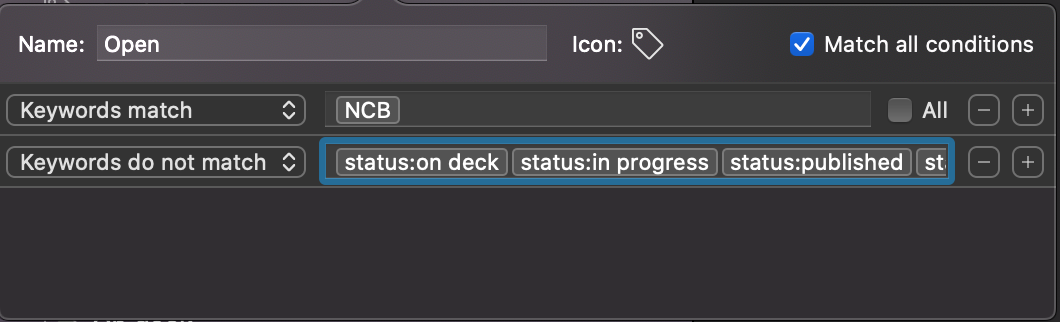
Here’s the revolution, part two. The project status board will show you every document in the project, and its status, all by using filters. To set this up, create a group, name it “Project Name + Status Board,” and set a meaningful icon. Next, in this group, create a filter for each of your Kanban steps established above. You’ll want to set two keyword filters: one for the name of the project, and the second for the current step; checkbox “all” to ensure both keywords apply. I also create a starter step, “Open,” which is set just to the project name, and not any of the Kanban project statuses. That captures every rough idea, thought, etc. that hasn’t yet been vetted into the writing process.
5. Migrate your project documents to your document repository, tagging as you go
Finally, you can start to let go of the old chaos. Take each document from its old folder or folders, add the project keyword to it and, optionally, a Kanban status, and drop it in the repository. Magically, you’ll see it appear in your project status board as you go along.
6. Wash, rinse, and repeat over time, for each of your projects
Setting up individual filters is the hardest part. Since most have two tags to add, I typically copy and paste them from a prior project status board, and edit them with the new project name instead of creating them fresh.
Tips and Tricks with the Ulysses Kanban System
- Always set a project tag. You can forget everything else but get into the habit of always setting a project keyword to every new document.
- Click the Status Board Group for a quick overview. The group will list every document at each filter stage, so you can quickly scan down the statuses and see where things are.
- Set your project keywords as favorites. Somewhat hidden feature, but in any document -> Attachments -> Keywords ->
+marker -> Manage Keywords brings up a modal where you can set your Favorites. This moves your project keywords one click closer — click the +, and see them right away.
How about you? How do you keep your Ulysses writing projects sorted? Feel free to send me a note on Bluesky @nickgracilla.